Knowledge Base

"How To Tasks — Tricks & Tips"

PROGRAM: DataPlus - How To


Table of Contents
Manage Permissions
Current Connections
    Manage Permissions
  1. Act Menu
  2. Tools/DataPlus 4.0/Manage Permission
DataPlus Menu
    Manage Permissions
    Current Connections
  1. Click Sage 100
  2. Permissions
  3. Click View Permissions Tab
  4. Check box for each "View Name" that will be accessed by "ACT! User"
  5. You can double click the header to check or uncheck all
DataPlus Menu
    Manage Permissions
    Misc Permissions
  1. Click Misc Permissions Tab
  2. Check View - enable views in ACT! DataPlus tab (overrides View Permissions)
  3. Check Export - export view to excel
  4. Check S100 Contact Push - enables creating Contracts
  5. Check S100 SO Push - enables creating Sales Orders
  6. You can double click header or row to check or uncheck all
DataPlus Menu
    Manage Permissions
    Sales Representatives
  1. Click Sales Representative Tab
  2. Check Box for each sales representative for view permissions
  3. Blank field is for entities that have no Sales Representative listed
  4. You can double click the header or row to check or uncheck all
  • Most views have the "Sales Representative" from Sage 100 Accounting listed. Each Sales Representative will only be able to see view where they are the Sales Representative.
  • You can also enable Sales Representative to see other Sales Representative information. Example, sales manager may need to view each Sales Representative's views on their team.
  • DataPlus Tab should be available for each DataPlus Client after "DataPlus Client Install".
DataPlus Menu
    Manage Permissions
    Sales Representatives
    Non Act Sales Representatives
  1. Right mouse click header Add Non-ACT! User to add non users that are not in ERP/accounting or that are custom
DataPlus Menu
    Manage Permissions
    Type HouseAccount or your custom name
    Non Act Sales Representatives
  1. Click Add
  2. Click OK
  3. Repeat this for each Non Act User
DataPlus Menu
    Manage Permissions
  1. Click Save
  2. Click Close
  3. Click Yes
  4. Click OK
DataPlus Menu
    Manage Permissions
    Sales Representatives
    Non Act Sales Representatives
  1. Restart "Manage Permission" and "Sales Representatives"
  2. Check Box for each sales representative for HouseAccount
  3. Click Save
  4. Click Close
  5. Click Yes
  6. Click OK
  7. Restart "Act"
Remove Selected Entities
    From Act
  1. Open Act
  2. Menu Bar
    1. Tools / DataPlus 4.0 / Manual Import
    Manual Import Settings
  3. Click on your application frofile S50
  4. Note: Profile name is dependent on integrated application.
  5. Click Import Options browse button [ ... ]
Remove Selected Entities
    Import Options
  1. Check Only Run Selected Items
  2. Check Remove Selected Entities
  3. Check S50: (100) Company Customer
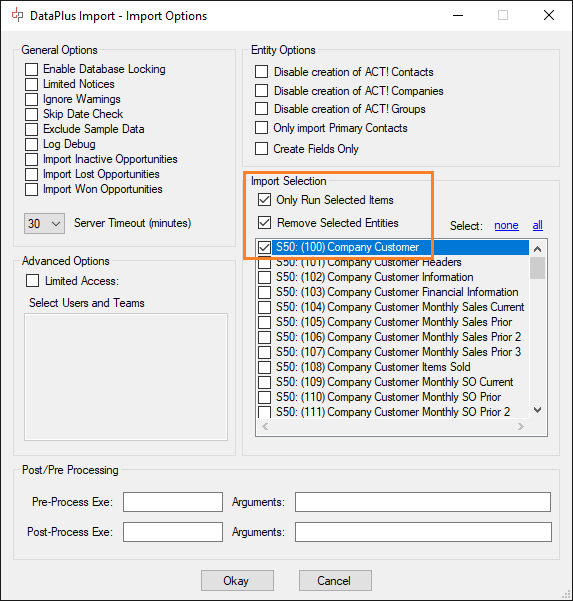
  4. Note: Check each "parent" entiy you would like the remove.

    Entities will be removed based on the e...ID relationship. ie "eCustomerID, eVendorID"

    Entities can be removed from the Company & Contact level in Act

  5. Click on Okay
Remove Selected Entities
    Really Remove?
  1. Selected entities
    1. S50: (100) Company Customer
    Note: Each entity listed will be "permanently removed"
  2. Click on Cancel if you do not want to perform removal
  3. Click on Yes if you do want to perform removal
Remove Selected Entities
    Manual Import Settings
  1. Click on Import Selected Your chosen entities will be removed.
Uninstall DataPlus Addons or Plugins
Uninstall Addons / Plugins
    Programs and Features
  1. Open Windows Control Panel
    1. Start/Control Panel or
    2. Start/Search/Control Panel or
    3. Start/Apps and Features/Scroll down to Programs and Features
  2. Select DataPlus program
  3. Click on Uninstall
Note: Uninstalling the program will also deactivate the program on current machine.

Uninstall Addons / Plugins
    Programs and Features DataPlus Uninstall
  1. Click on Uninstall
  2. Note: This feature will apply to all DataPlus Addons and/or Plugins. The branding in open window will depend on which program you choose.
Uninstall Addons / Plugins
    File Explorer
  1. Open File Explorer
  2. Server Uninstall
  3. Browse to C:\Program Files (x86)\Hogan Data
  4. Click on Folder relating with your uninstall (if folder exists)
  5. Delete Folder
  6. Client Uninstall (Act integration)
  7. Browse to D:\Program Files (x86)\ACT\Act for Windows\Plugins
  8. or
  9. Browse to D:\Program Files (x86)\ACT\Act for Windows\Tools
  10. Click on Folder relating with your uninstall (if folder exists)
  11. Delete Folder
   
Software Solutions
DataPlus Integration
DataPlus ERP Integration
DataPlus Custom Integration
DataPlus Addons
DataPlus Plugins & Tools
Hosting Solutions
Mobile Solutions
QuoteWerks Quoting Solutions
QuoteWerks Integration
QuoteWerks Subscription & Licensing
Act! CRM Solutions
CRM
CRM & Marketing Automation
Marketing Automation
Pricing
Mobile Solutions
Helpful Links
Act! Hosting Solutions
Act! Mobile Messenger
Act! ERP Integration
Act! Custom Integration
Act! Addons
Act! Plugins & Tools
Act! Training
Act! Resources
Act! Support
Act! Community
Act! Downloads & Updates
Learning - Support
Software Support
Support (GoToAssist)
Support Plans
Training
Act! Training
KB Hogan Data / DataPlus
KB Act! Questions
KB QuoteWerks Questions
Contact Us
About Us
How Can We Help You
Privacy Policy
Return Policy
Resources
DataPlus Subscription
DataPlus Maintenance
QuoteWerks Maintenance
Partner Lead Submission
Secure CC Authorization
Secure CC Pre-Authorization

Translate this page:
©1995 - 2019 HOGAN DATA | All rights reserved