Software Solutions
DataPlus
DataPlus Software
DataPlus Software - ERP / Accounting Integration
DataPlus Software - Custom Integration
DataPlus Software - Addons
DataPlus Software - Plugins & Tools
Hosting Solutions
Quoting
QuoteWerks
QuoteWerks Integration
QuoteWerks Subscription & Licensing
CRM Solutions
ERP Addons
Custom Integration
Addons
Plugins & Tools
Training
Support
Support
Support
Software Support
Support (FixMe.IT)
Support Plans
Training
Software Training
Training
Knowledgebase (KB)
KB Hogan Data / DataPlus
KB Frequent Act Questions
KB Frequent QuoteWerks Questions
Resources
About Us
How Can We Help You
DataPlus Subscription
DataPlus Maintenance
QuoteWerks Maintenance Program
Partner Access
Partner Lead Submission
Payment Solution
Secure Credit Card Authorization
Secure Credit Card Pre-Authorization
Knowledge Base
PROGRAM
: DataPlus QuickBooks - Harvester Configuratioin
Table of Contents
Harvester Configuration
Harvester
Harvest All Entities
Harvest Ad Hock Entities
Harvester Connection Override
Harvester Commandline
Related FAQs
Activation
Server Installation
Client Installation
Harvester
Push Contact
Push Act Opportunity
Create Sales Order
Act Configuration
Messages or Errors
QuickBooks Harvester
Start QuickBooks Harvester
Click on Start/All Programs/Hogan Data/dpQuickBooks/
QuickBooks Harvester
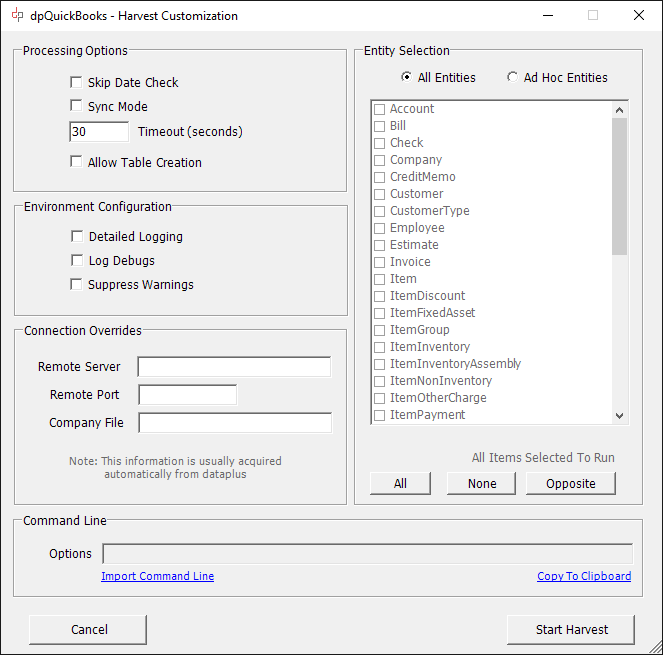
Processing Options
unCheck
Skip Date Check
Note: New data in enties will sync based on last sync date. You can check Skip Date Check if you want to perform full import.
unCheck
Sync Mode
Enter
30
Timeout (seconds)
Note: Timeout can be adjusted if you have a very large database and connection to QuickBooks is timeing out.
unCheck
Allow Table Creation
Note: When checked QBTables in DataPlus SQL database are created or recreated.
Environment Configuration
unCheck
Details Logging
unCheck
Lob Debugs
unCheck
Suppress Warnings
Note: If Harvesting issues are present, checking logs will facilitate discovery of problems.
Start QuickBooks Harvester
Entity Selection
All Entities
Choose
All Entities
Note: This will sync all QuickBooks entities to the DataPlus SQL database (dpQuickBooks).
Note: Current list of available enties. Child enties are also encluded. e.g. Invoice / Invoice Line Items
Start QuickBooks Harvester
Entity Selection
Ad Hock Entities
Choose
Ad Hock Entities
Note: This will sync selected QuickBooks entities to the DataPlus SQL database (dpQuickBooks).
Note: Current list of available enties. Child enties are also encluded. e.g. Invoice / Invoice Line Items
Sample
Check
Customer
Check
Customer Type
Check
Estimate
Check
Invoice
Sample
Click on
All
Checks all entities then you can uncheck entities you do not want to sync
Click on
None
No entities checked, then you can check entities you do want to sync
Click on
Opposite
Entities checked will be unchecked and enties unchecked will be checked.
Click on
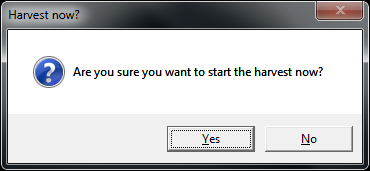
Start Harvest
Are you sure you want to start the harvest now?
Click
Yes
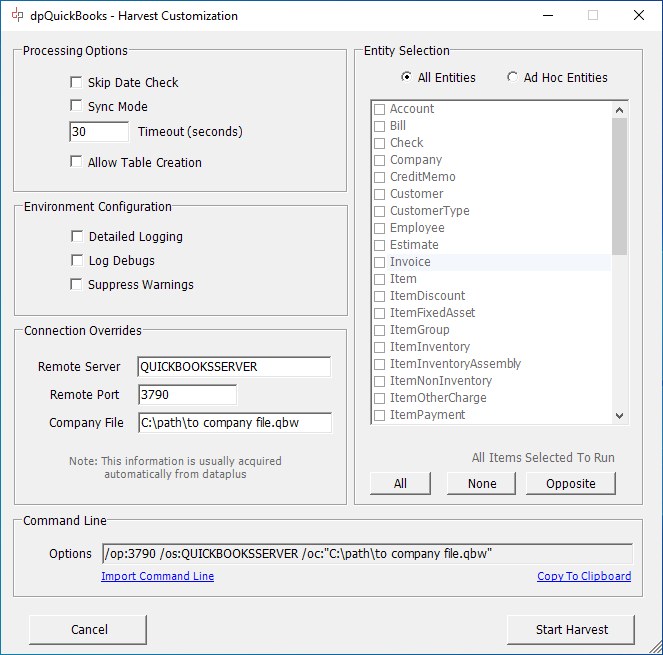
QuickBooks Harvester - Connection Override
Start QuickBooks Harvester
Connection Overide
As you modify/customize the sections, tags will be added to the command line, reflecting your changes.
Connection Overide
Remote Server
QUICKBOOKSSERVER
Remote Port
3790
Company File
C:\path\to company file.qbw
Note: The purpose of "Connection Override" is to change the default configuration of Harvester.
This would allow you to Harvest a different QuickBooks company files.
This can be saved & run with a batch file
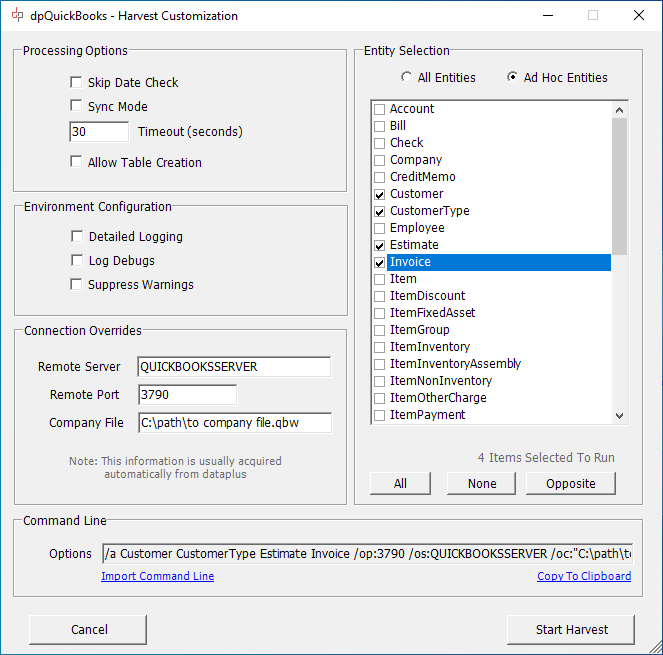
Entity Selection
Click on
All Entities
Or click on
Ad Hoc Entities
if you want to run specified entities.
Start QuickBooks Harvester
Command Line
Entity Selection
Check
Ad Hoc Entities
you want harvested
Ensure QuickBooks is open
Click on
Start Harvest
Are you sure you want to start the harvest now?
Click
Yes
Start QuickBooks Harvester
Command Line
Harvesting
Start QuickBooks Harvester
Command Line
Harvest Complete
Click on
Close & Review
if you want to review
Click on
Close
Start QuickBooks Harvester
Batch File
Download zipped batch file sample
here
.
Save zipped batch file to
C:\Program Files\Hogan Data\DataPlus 4.0/
Note: Your DataPlus server installatiion should have created the file for you in the above location.
Unzip
Import-QBH.CommandLine.zip
in current location.
Edit batch file
Import-QBH.CommandLine.bat
Copy the Command Line from Harvester by clicking on
Copy To Clipboard
Start QuickBooks Harvester
Batch File
Replace the command line on the right with your copied command line from Harvester.
Save
Import-QBH.CommandLine.bat
Import-QBH.CommandLine.bat
can manually be run from C:\Program Files\Hogan Data\DataPlus 4.0/
You can also run
Import-QBH.CommandLine.bat
on a scheduled basis using Windows Task Scheduler
"C:\Program Files\Hogan Data\DataPlus 4.0\dpQuickBooks-Harvester-Console.exe"
/op:3790 /os:QuickBooksServer /oc:"C:\path\to company file.qbw"
Related FAQs
Activation
Server Installation
Client Installation
Harvester
Push Contact
Push Act Opportunity
Create Sales Order
Act Configuration
Messages or Errors
Software Solutions
DataPlus Integration
DataPlus ERP Integration
DataPlus Custom Integration
DataPlus Addons
DataPlus Plugins & Tools
Hosting Solutions
QuoteWerks Quoting Solutions
QuoteWerks Integration
QuoteWerks Subscription & Licensing
CRM Solutions
ERP Integration
Custom Integration
Addons
Plugins & Tools
Training
Support
Learning - Support
Software Support
Support (GoToAssist)
Support Plans
Software Training
Training
KB Hogan Data / DataPlus
KB QuoteWerks Questions
Contact Us
About Us
How Can We Help You
Privacy Policy
Return Policy
Resources
DataPlus Subscription
DataPlus Maintenance
QuoteWerks Maintenance
Partner Lead Submission
Secure CC Authorization
Secure CC Pre-Authorization
Translate this page:
©1995 - 2019 HOGAN DATA | All rights reserved