Software Knowledge Base
PROGRAM: DataPlus for Sage 50 US - Server Installation

Table of Contents
What you need prior to installation?
32 Bit OS Operating Systems
  1. Create MS SQL Server or MS SQL Express 32 bit instance
    1. Act! instance of SQL may be used with caution.
    2. Specify SQL Server administrators
    3. If in Domain environment we recommend adding Domain Administrators
    4. Authentication Mode
    5. Mixed Mode
    6. Make SA enabled
    7. Create sa password and keep for your records
  2. Compatible MS SQL Versions
    1. SQL 2016
    2. SQL 2014
    3. SQL 2012
    4. SQL 2008
  3. SQL Server Management Studio (SSMS)
  4. SQL Security - User Logins
    1. Windows Login Options (use either type)
      1. Type: Windows User
      2. Type: Windows Group
64 Bit Operating Systems
  1. Create MS SQL Server or MS SQL Express 64 bit instance
    1. Act! instance of SQL may be used with caution.
    2. Specify SQL Server administrators
    3. If in Domain environment we recommend adding Domain Administrators
    4. Authentication Mode
    5. Mixed Mode
    6. Make SA enabled
    7. Create sa password and keep for your records
  2. Compatible MS SQL Versions
    1. SQL 2016
    2. SQL 2014
    3. SQL 2012
    4. SQL 2008
  3. SQL Server Management Studio (SSMS)
  4. SQL Security - User Logins
    1. Windows Login Options (use either type)
      1. Type: Windows User
      2. Type: Windows Group
Sage 50 US
  1. Version: Sage 50 US 2013 - 2015
  2. Version: Sage 50 US 2016 or higher for DataPlus Sage 50 US Push Component
  3. .NET 4.5.2 installed for DataPlus Sage 50 US Push Component
  4. Sage 50 US installed (Quantum, Premium or Pro)
  5. Path location of your company database
    1. Sage Menu
    2. Maintain/Company Information/
    3. Directory ...
Act! Premium
  1. Version: Act Premium 2013 or higher
  2. Version: Act Premium v16 or higher
  3. Act Premium installed
What you need for installation?
  • DataPlus for Sage 50 US installer (DataPlus-Sage50US-Install.exe)
  • Act! database for Sage 50 US
    • Hogan Data provides a Act! database with the purchase of DataPlus for Sage 50 US Application
    • Or you can use your existing database
    • There will be new fields created & will have to be added to layout
    • Review Act! Database Configuration
  • Act! Administrator username and password
  • Window's Administrator or Window's Domain Administrator username and password
Network Environment
Scenario 1
  1. Sage installed a Server 1
    1. Install DataMirror for PT
    2. DataPlus Sage 50 US Bridge
  2. Act installed a Server 2
    1. Install DataPlus SQL Instance (Act instance can be used with caution).
    2. Install SQL Management Studio
    3. Install DataPlus for Sage 50 US (Server/Client)
    4. Do not install DataMirror for PT
Scenario 2
  1. Sage installed a Server 1
  2. Act installed a Server 1
    1. Install DataPlus SQL Instance (Act instance can be used with caution).
    2. Install SQL Management Studio
    3. Install DataPlus for Sage 50 US (Server/Client)
Scenario 3
  1. Sage installed a Server 1
    1. Install DataPlus SQL Instance
    2. Install DataMirror for PT
    3. DataPlus Sage 50 US Bridge
  2. Act installed a Client 1
    1. Install SQL Management Studio
    2. Install DataPlus for Sage 50 US (Server/Client)
    3. Do not install DataMirror for PT
Scenario 4
  1. Sage installed a Server 1
  2. Act installed a Server 1
    1. Install DataPlus SQL Instance (Act instance can be used with caution).
    2. Install SQL Management Studio
    3. Install DataPlus for Sage 50 US (Server/Client)
Server Installation
DataPlus Setup
    Welcome Screen
  1. Right click DataPlus-S100US-Install.exe and "Run as administrator
  2. This will start the DataPlus 4.0 setup wizard.
  3. Click on Next >
DataPlus Setup
    License Agreement
  1. License Agreement
  2. If you agree, check "I accept the terms in the license agreement"
  3. Click on Next >
DataPlus Setup
    Server Components
  1. If you are going to install just the server component, check "Server Components"
  2. Click on Next >

DataPlus Setup
    Server/Client Components
  1. If you are going to install server and client component, check "Server Components" and "Client Components"
  2. Click on Next >

DataPlus Setup
    Choose Install Location
  1. Click on Install
DataPlus Setup
    Installing
DataPlus Setup
    Server Credentials
    Server Settings
  1. SQL Server Name: Server\SQLInstanceName
  2. Database Name: dpDataMirrorForPT
  3. Credential Settings Windows Authentication
  4. User: sa or other user you setup
  5. Password: password
  6. Integrated Security
  7. CHECK for Integrated Security
  8. Click on Next >
DataPlus Database Setup
    Perform Installation
  1. Click on Yes
DataPlus Database Setup
    Create Database
  1. Click on Yes
DataPlus Database Setup
    Finished
  1. Installation Complete
  2. Click on Finish
DataMirrorforPT Installation
    DataMirror Welcome
  1. Click on Next >
DataMirrorforPT Installation
    Installation Wizard
  1. License Agreement
  2. Click on Radio Button I accept the terms in the license agreement
  3. Click on Next >
DataMirrorforPT Installation
    Installation Wizard
  1. Readme Information
  2. Click on Next >
DataMirrorforPT Installation
    Installation Wizard
  1. Ready to Install Program
  2. Click on Install
DataMirrorforPT Installation
    Installing..
DataMirrorforPT Installation
    Installation Complete
  1. Install Wizard Completed
  2. Click on Finish
DataMirror DefaultMirrorData.xml
  1. 32bit pc browse to: C:\Program Files\Hogan Data\DataPlus 4.0
  2. 64bit pc browse to: C:\Program Files (x86)\Hogan Data\DataPlus 4.0
  3. Open DataMirror DefaultMirrorData.xml in notepad to edit.
DataMirror DefaultMirrorData.xml
  1. Change <DataSource> .\SQLEXPRESS</DataSource>
  2. To your Server\sqlinstancename
  3. If needed
  4. <Username> Username</Username>
  5. <Password> Password</Password>
  6. Save and close
Note: When you open DataMirror it will first read the xml file for the location of it's database. DataMirrorForPT.

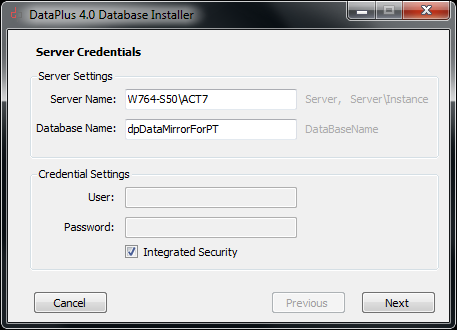
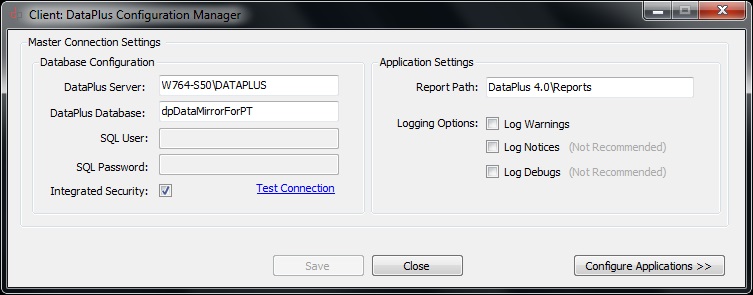
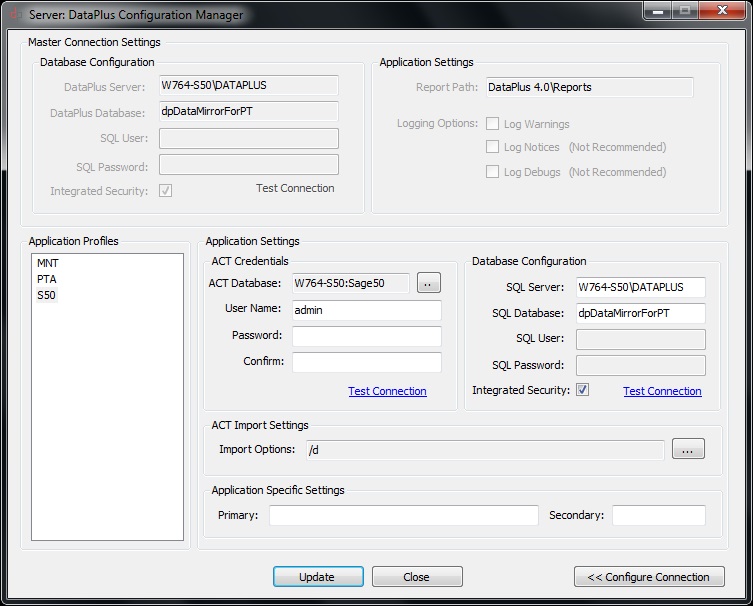
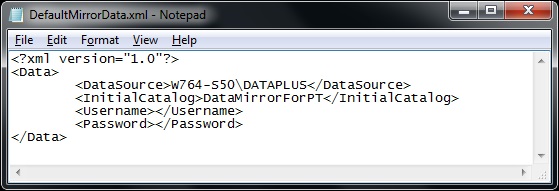
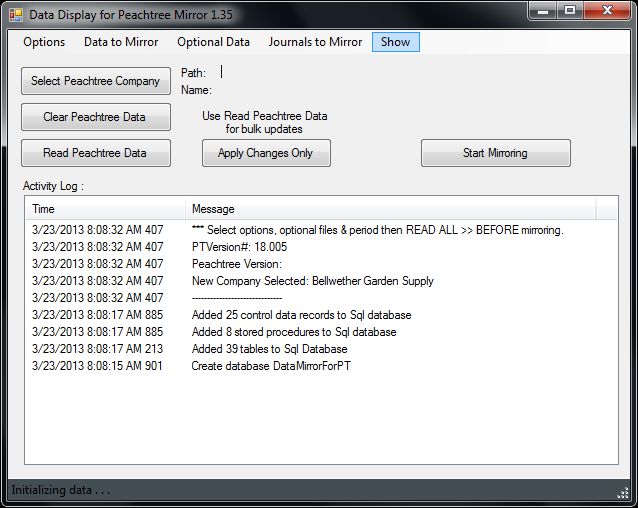
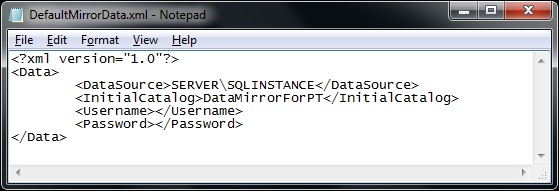
Note: If your sql install does not have an instance name then you should enter servername only.

DataMirror DefaultMirrorData.xml
  1. Right click DM CheckStart (64BIT).bat
  2. Choose Run as administrator
  3. Note: This task will copy "DefaultMirrorData.xml" file to the Multiware program directly.
  4. Launch Display Mirror
Data Display for Sage 50
    Register Product
  1. Order Key from Invoice YOURORDERKEYNUMBER
  2. Computer Name/Location YOURCOMPUTERNAME/ LOCATION
  3. Click on Register
  4. Or Use Trial
  5. Click on Continue Trial
Data Display for Sage 50
    Data Display Launched
  1. DataMirror will now look up SQL Instance if DefaultMirrorData.xml was not configured
  2. If Select Sage 50 Company does not launch, Click on Select Sage 50 Company
Data Display for Sage 50
    Select a Sql Instance
  1. If you did not edit the DataMirror DefaultMirrorData.xml file, then "Select a Sql Instance appears.
  2. Select Instance
  3. Click on OK

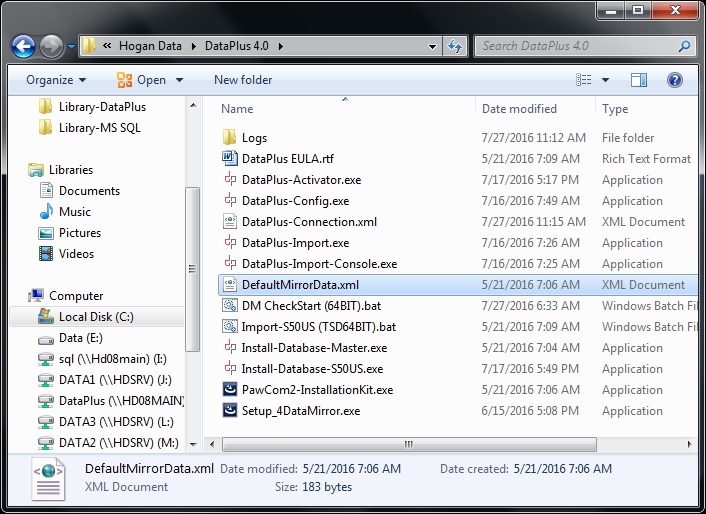
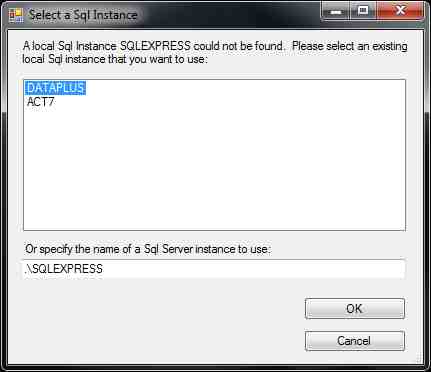
Note: If your sql install does not have an instance name then it will not appear in list. Edit your DefaultMirrorData.xml file.
Data Display for Sage 50
    Select Sage 50 Company
  1. Ensure that you have first opened your Sage 50 US Company database
  2. Sage 50 Companies Found
  3. Choose Company
  4. Click OK
Data Display for Sage 50
    Configured Company
  1. Minimize window
DataPlus Setup
    Server Credentials
    Server Settings
  1. SQL Server Name: Server\SQLInstanceName
  2. Database Name: dpDataMirrorForPT
  3. Note: This is the database name you originally created. Installer will add additional components. Choose Integrated Security or uncheck for SQL credentials
    Credential Settings
    Windows Authentication
  4. User: sa or other user you setup
  5. Password: password
  6. Integrated Security
  7. CHECK for Integrated Security
  8. Click on Next >
DataPlus Database Setup
  1. Click Finish
Hogan Data Bridge
  1. If .NET Framework 4.5.2 is not installed, installer will launch
  2. Click Install
Hogan Data Bridge
  1. Downloading
Hogan Data Bridge
  1. Click Yes
Hogan Data Bridge
  1. Installing
Hogan Data Bridge
  1. Installing
Hogan Data Bridge
  1. Preparing to install...
Hogan Data Bridge
  1. Click Install
Hogan Data Bridge
  1. Installing
Hogan Data Bridge
  1. Click Finish
DataPlus Setup
  1. Installation Complete
  2. Click Next >
DataPlus Setup
    Run Server Configuration
  1. CHECK to run Server Configuration
  2. Click on Finish

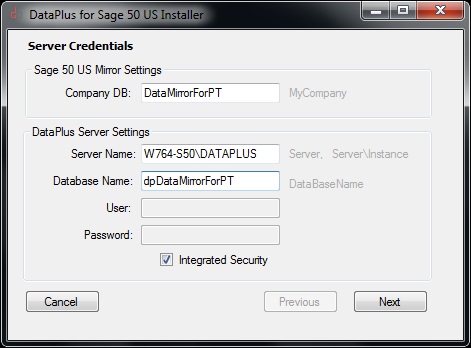
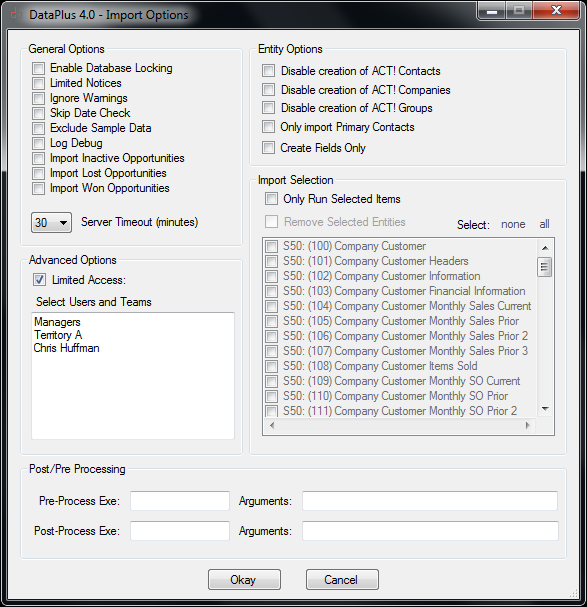
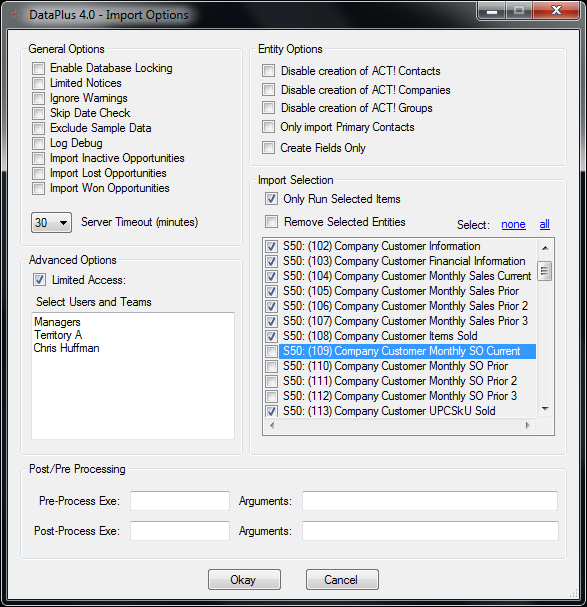
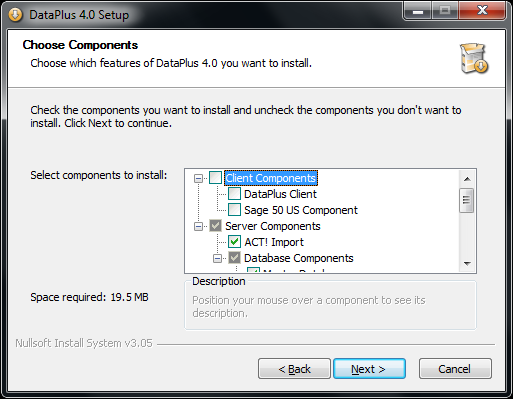
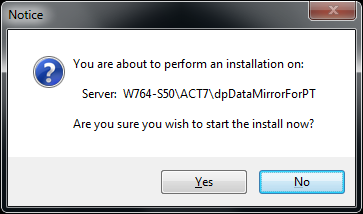
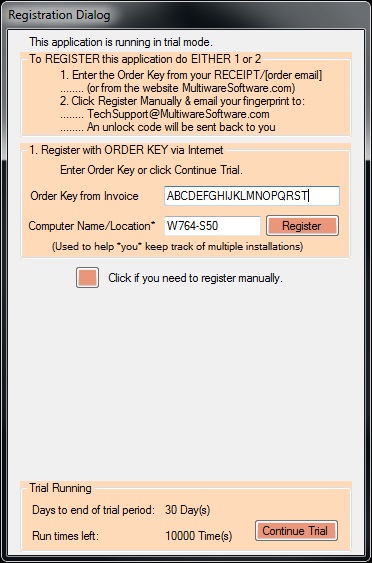
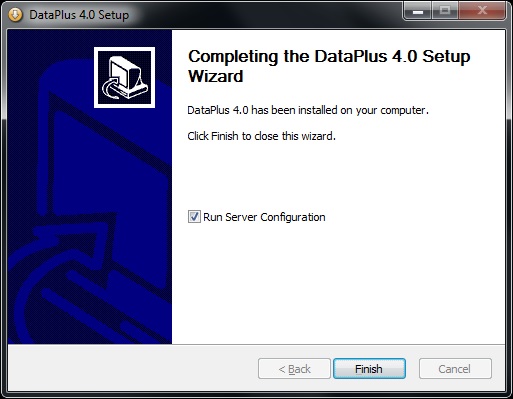
If you chose Server & Client components, then dialog box below will appear.

Client Configuration Manager
  1. Click on Close
Server Configuration Manager
    Master Connection Settings
    Database Configuration
  1. DataPlus Server: ServerName
  2. DataPlus Database: DataBaseName
  3. Windows Authentication
  4. SQL User: sa
  5. SQL Password: password
  6. Integrated Security
  7. CHECK for Integrated Security
  8. Testing Connection
  9. Test Connection
  10. Click on OK
  11. Application Settings
  12. Report Path: unc Path to CR Reports
  13. Logging Options:
  14. unCHECK Log Warnings
  15. unCHECK Log Notices
  16. unCHECK Log Debugs
  17. Click on Save
  18. Click on Configure Applications >>
Server Configuration Manager
    Application Profiles
  1. Click on S50
  2. Application Settings
    Act Credentials
  3. Database; ActDatabaseName click on [..] to browse to database
  4. User Name: ActUserName must be an Act administrator
  5. Password: ActPassword
  6. Confirm: ActPassword
  7. Test Connection
  8. Click on OK
  9. Database Configuration
  10. Database: dpS50 DataPlus database name
  11. Server: ServerName\Instance SQL Instance if applicable
  12. SQL User: sa
  13. SQL Password: password
  14. Check if you want integrated security
  15. Test Connection
  16. Click on OK
  17. Click on Update
  18. Click on OK
  19. Click on PTA Perform the same task as S50
  20. Click on MNT Perform the same task as S50
  21. Click on Close
DataMirror Read
Mirror Sage 50 Data
  1. Maximize DataMirror
  2. Menu/Options
Note: DataPlus menus have not been configured. We will address this later in KB.
Mirror Sage 50 Data
    DataMirror Options
  1. Uncheck Read All Audit Trail Data
  2. Uncheck Enable File Mirror
  3. 500 Timer Interval
  4. 10 Delay Count
  5. Click on Close
Mirror Sage 50 Data
    DataMirror Update
  1. Click on Read Peachtree Data
  2. Click on Start Mirroring
  3. Minimize and keep running to continue keeping Sage 50 data current
Mirror Sage 50 Data
    Auto Load DataMirror for Sage 50 Mirror
  1. Schedule Task Manager to run DM CheckStart.bat
  2. Location: Browse to C:\Program Files\Hogan Data\DataPlus 4.0\DmCheckStart.bat" 32 bit
    or
    Location: Browse to C:\Program Files (86)\Hogan Data\DataPlus 4.0\DmCheckStart.bat" 64 bit
    If you do not have the file, please Contact Us
  3. This file will check and see if "DataMirror for Sage 50 Mirror" is running, if not start it.

DataPlus Act Manual Import - Employees Only
Server Configuration Manager
    Manual Import
  1. Open Act
  2. Click OK
Note: DataPlus menus have not been configured. We will address this later in KB.
Server Configuration Manager
    Manual Import
  1. Tools/DataPlus 4.0/Manual Import
If you are using your own custom Act! database, the custom fields should be created.
In the Act Import process, DataPlus can create the custom fields.
Server Configuration Manager
    Manual Import
  1. Click on S50
  2. Click on Browse
Server Configuration Manager
    Manual Import
    Employee Only Import
  1. Check Enable Database Locking
  2. Check Only Run Selected Items
  3. Check S50: (500) Employee
  4. Check S50: (501) Employee Header
  5. Click on Okay
The purpose of importing employees only is to establish your connection to "Act Users"
Server Configuration Manager
    Manual Import
    Employee Only Import
  1. Click on Import Selected
Server Configuration Manager
    Manual Import
    Employee Only Import
    Import Complete
  1. Click on Close
  2. or ...
  3. Click on Close & Review
  4. Create Users in Act from Employees
  5. In Act
  6. Tools/Manage Users...
  7. Create New User
  8. Create User from Contact - Create a new User from an existing Contact.
  9. Create users using the imported Employees

DataPlus Act Default Import Configuration
Auto Import Configuration
  1. Open DataPlus 4.0 Server Configuration
  2. Windows Start / Hogan Data / DataPlus 4.0 / DataPlus 4.0 Server Configuration
Auto Import Configuration
    Server Configuration
  1. Click on Configure Applications >>
Auto Import Configuration
    Server Configuration
    ACT Import Settings
  1. Import Options
  2. Click on [...] to browse to options
Auto Import Configuration
    Import Options
    General Options
  1. UnCheck Enable Database Locking
  2. UnCheck Limited Notices
  3. UnCheck Ignore Warnings
  4. UnCheck Skip Date Check
  5. UnCheck Exclude Sample Data
  6. UnCheck Log Debug
  7. UnCheck Import Inactive Opportunities
  8. UnCheck Import Lost Opportunities
  9. UnCheck Import Won Opportunities
  10. Note: If importing opportunities is enabled, leaving option UnChecked for "Import Opportunities" will disable any changes to be made with "Closed" opportunities.
  11. Set Server Timeout (minutes) (default = 2) (you can increase this as needed) Entity Options
  12. UnCheck Disable creation of Act! Contacts
  13. UnCheck Disable creation of Act! Companies
  14. Note: Check "Disable creation of Act! Companies" if you do not want to import Companies in the "Company Level" in Act
  15. UnCheck Disable creation of Act! Groups
  16. UnCheck Only Import Primary Contacts
  17. Note: Check "Only Import Primary Contacts" if you only want to import primary contacts
  18. UnCheck Create Fields Only
  19. Import Selection
  20. UnCheck Only Run Selected Items
  21. UnCheck Remove Selected Items (greyed out, unless Selected Items are checked)
  22. Advanced Options
  23. UnCheck If you are not using Limited Access in Act
  24. Check If you are using Limited Access in Act
  25. Select Users and Teams
    If you are using Act! Limited Access, you can choose:
    • Specific Act! Team(s)
    • Specific Act! User(s)
    Post/Pre Processing
  26. Pre-Process Exe: Leave blank
  27. Arguments: Leave blank
  28. Post-Process Exe: Leave blank
  29. Arguments: Leave blank

    IMPORTANT:
  • If you are not using the Act! database provided by Hogan Data, for Sage 100, when the first import is performed, additional fields may be required. Therefore, uncheck "Disable Database Locking" in order for the additional fields to be created.
  • By default, if the "Sales Representative" in Sage 100 equals the Act User Name in Act, the Sales Represetative name will populate the "Sales Representative" field in Act, and will also be the Act "Record Manager". The names have to be an exact match.
Auto Import Configuration
    Import Selection
  1. UnCheck Only Run Selected Items
  2. Click Okay if you want to import all entities
Note: Leaving "Only Run Selected Items" UnCheck will allow all entities to import into Act. However, there are some additional specific parameters for some entities to import. ie Act Opportunities.
  1. Check Only Run Selected Items
Note: Checking "Only Run Selected Items" will allow chosen entities to import into Act. However, there are some additional specific parameters for some entities to import. ie Act Opportunities.
Auto Import Configuration
    Import Selection
  1. Check each entity you want to import into Act
  2. Click all to choose all entities, then unCheck entities you do not want to import.
  3. Click Okay when completed.
DataPlus Act Manual Import - Preferred Entities
Server Configuration Manager
    Manual Import All
  1. ReRun DataPlus Manual Import
  2. Use your default configuration
Server Configuration Manager
    Manual Import All
  1. Click on Close
  2. DataPlus Import
  3. Click on Close
  4. or ...
  5. Click on Close & Review

DataPlus Act User Configuration
DataPlus Menu
  1. Open Act!
  2. No Menu Found
  3. DataPlus 4.0 Warning
  4. Click OK
DataPlus menus have not been configured. When DataPlus is configured in the following steps, this message will be disabled.
DataPlus Menu
    Manage Permissions
  1. Act Menu
  2. Tools/DataPlus 4.0/Manage Permission
DataPlus Menu
    Manage Permissions
    Current Connections
  1. Click Sage 50 US

  2. Permissions
  3. Click View Permissions Tab
  4. Check box for each "View Name" that will be accessed by "Act User"
  5. You can double click the header to check or uncheck all
DataPlus Menu
    Manage Permissions
    Permissions
  1. Click Misc Permissions Tab
  2. Check View - enable views in Act DataPlus tab (overrides View Permissions)
  3. Check Export - export view to excel
  4. Check S50 Contact Push - Create Customer/Vendor/Employee
  5. - Edit Customer/Vendor
  6. Check S50 CONT Push - enables creating Contracts
  7. Check S50 EST Push - enables creating Estimates
  8. Check S50 INV Push - enables creating Invoices
  9. Check S50 SO Push - enables creating Sales Orders
  10. You can double click header or row to check or uncheck all
DataPlus Menu
    Sales Representative
    Permissions
  1. Click Sales Representative Tab
  2. Check Box for each sales representative for view permissions
  3. You can double click the header or row to check or uncheck all
  4. Click Save
  5. Click Close
  6. Click Yes
  7. Click OK
  • Most views have the "Sales Representative" from Sage 50 US Accounting listed. Each Sales Representative will only be able to see view where they are the Sales Representative.
  • You can also enable Sales Representative to see other Sales Representative information. Example, sales manager may need to view each Sales Representative's views on their team.
  • DataPlus Tab should be available for each DataPlus Client after "DataPlus Client Install".
DataPlus Act Manual Import - Remove Selected Entities
Auto Import Configuration
    Import Selection
    Remove Selected Entities
  1. Check each primary entity you want to be removed from Act
    1. (100) Company Customer
    2. (200) Company Vendor
    3. (300) Customer
    4. (314) Customer Ship To
    5. (400) Vendor
    6. (600) Salesperson
    7. Each Act Opportunity
Note: Typically this is a one time task and used when manually importing from within Act.
Related FAQs
   
Software Solutions
DataPlus Integration
DataPlus ERP Integration
DataPlus Custom Integration
DataPlus Addons
DataPlus Plugins & Tools
Hosting Solutions
Mobile Solutions
QuoteWerks Quoting Solutions
QuoteWerks Integration
QuoteWerks Subscription & Licensing
Act! CRM Solutions
CRM
CRM & Marketing Automation
Marketing Automation
Pricing
Mobile Solutions
Helpful Links
Act! Hosting Solutions
Act! Mobile Messenger
Act! ERP Integration
Act! Custom Integration
Act! Addons
Act! Plugins & Tools
Act! Training
Act! Resources
Act! Support
Act! Community
Act! Downloads & Updates
Learning - Support
Software Support
Support (GoToAssist)
Support Plans
Training
Act! Training
KB Hogan Data / DataPlus
KB Act! Questions
KB QuoteWerks Questions
Contact Us
About Us
How Can We Help You
Privacy Policy
Return Policy
Resources
DataPlus Subscription
DataPlus Maintenance
QuoteWerks Maintenance
Partner Lead Submission
Secure CC Authorization
Secure CC Pre-Authorization

Translate this page:
©1995 - 2019 HOGAN DATA | All rights reserved