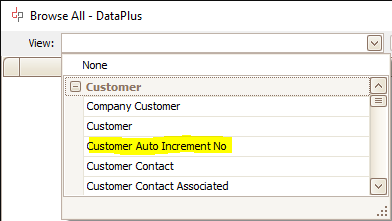
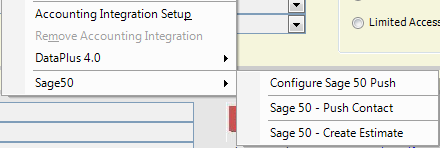
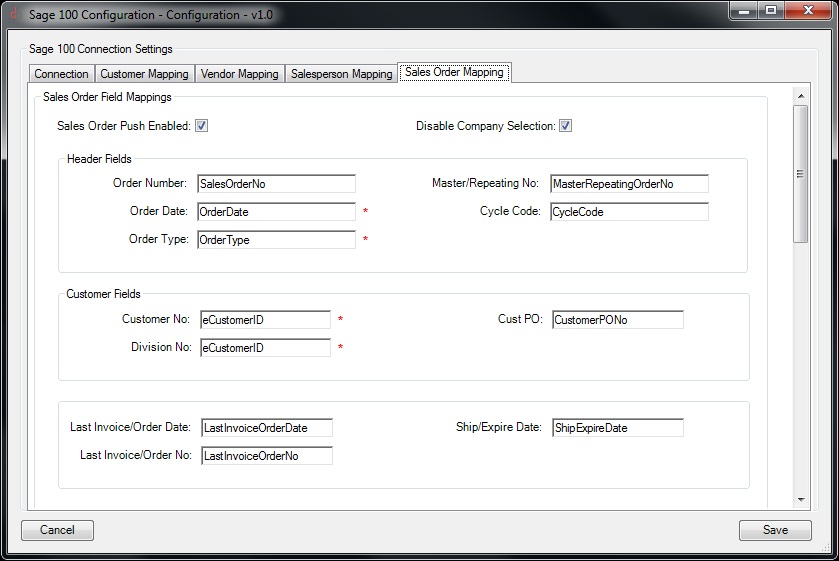
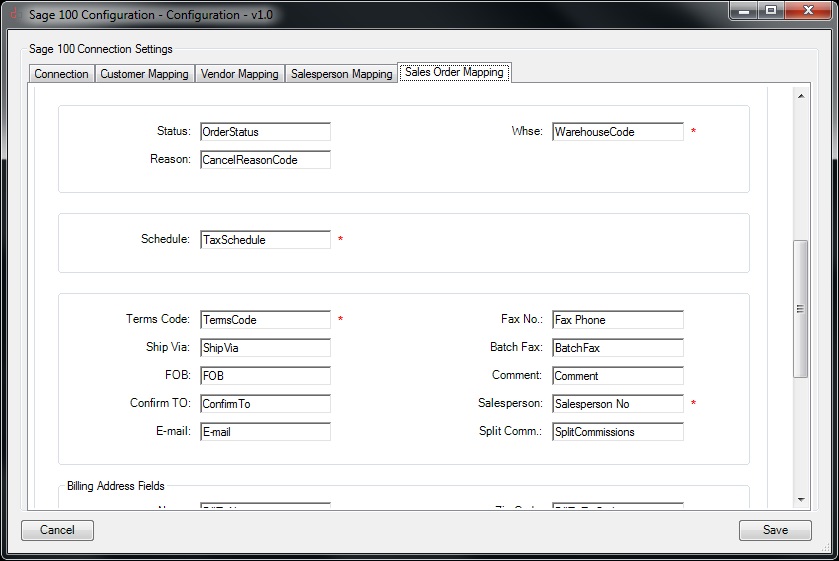
Knowledge Base
PROGRAM: DataPlus for Sage 100 - Push Configuration

Table of Contents
Configure Contact Push - Customer | Vendor | Salesperson
Configure Contact Push
  1. Open Act
  2. From Act Toolbar
  3. Tools/Sage100/Configure Sage 100 Push
Configure Contact Push
    TAB - Connection
    Company Settings
  1. Company Code: ABC
  2. User: user
  3. Password: userpassword
  4. Server
  5. Remote Server: servername or ip
  6. Port: 8000
  7. Click on Test Connection
  8. Click on Customer Mapping Tab
Configure Contact Push
    TAB - Customer Mapping
  1. If you want to allow customer push, check Customer Push Enabled
  2. Mandatory Fields
  3. Customer No: eCustomerID
  4. Division No: eCustomerID
  5. Salesperson No: Salesperson No
  6. Common Fields
  7. Name: Company
  8. Primary Contact Code: eContactID
  9. Contact Name: Contact
  10. Address 1: Address 1
  11. Address 2: Address 2
  12. City: City
  13. State: State
  14. Zip Code: Zip Code
  15. Country Code: Country
  16. Telephone: Phone
  17. Extension: Extension
  18. Fax: Fax Phone
  19. E-mail Address: E-Mail
  20. URL Address: Web Site
  21. Click on Vendor Mapping Tab
Configure Contact Push
    TAB - Vendor Mapping
  1. If you want to allow vendor push, check Vendor Push Enabled
  2. Mandatory Fields
  3. Vendor No: eVendorID
  4. Division No: eVendorID
  5. Common Fields
  6. Name: Company
  7. Primary Contact Code: eContactID
  8. Primary Contact: Contact
  9. Address 1: Address 1
  10. Address 2: Address 2
  11. City: City
  12. State: State
  13. Zip: Zip Code
  14. Country Code: Country
  15. Telephone: Phone
  16. Extension: Extension
  17. Fax: Fax Phone
  18. E-mail Address: E-Mail
  19. URL Address: Web Site
  20. Click on Salesperson Mapping Tab
Configure Contact Push
    TAB - Salesperson Mapping
  1. If you want to allow salesperson push, check Salesperson Push Enabled
  2. Mandatory Fields
  3. Salesperson No: eSalespersonID
  4. Division No: eSalespersonID
  5. Common Fields
  6. Name: Contact
  7. Address 1: Address 1
  8. Address 2: Address 2
  9. City: City
  10. State: State
  11. Zip: Zip Code
  12. Country Code: Country
  13. Telephone: Phone
  14. E-mail Address: E-Mail
  15. Click on Save
  16. Click on OK
  17. Exit Act and reopen (or go to next step for Configure Transaction Push)
Configure Contact Push Numbers
Contact No
    Customer, Vendor, Salesperson
  1. Division
  2. Followed by dash
  3. Followed by code
  4. Customer Contact, Vendor Contact
  5. Division
  6. Followed by dash
  7. Followed by code
  8. Followed by dash
  9. Followed by contact code
Note: Sage 100 Customer No can be auto-generated using dpSmartField plugin.
More about dpSmartField plugin.
Sample Configuration

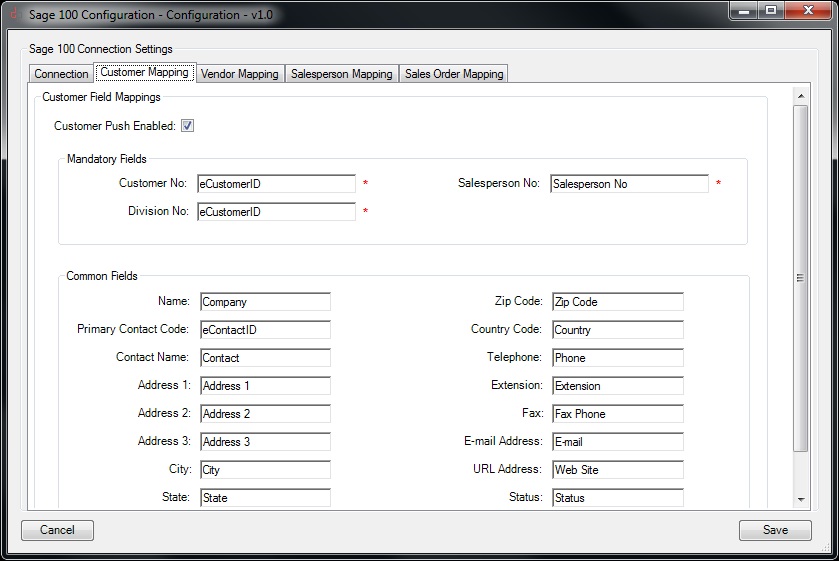
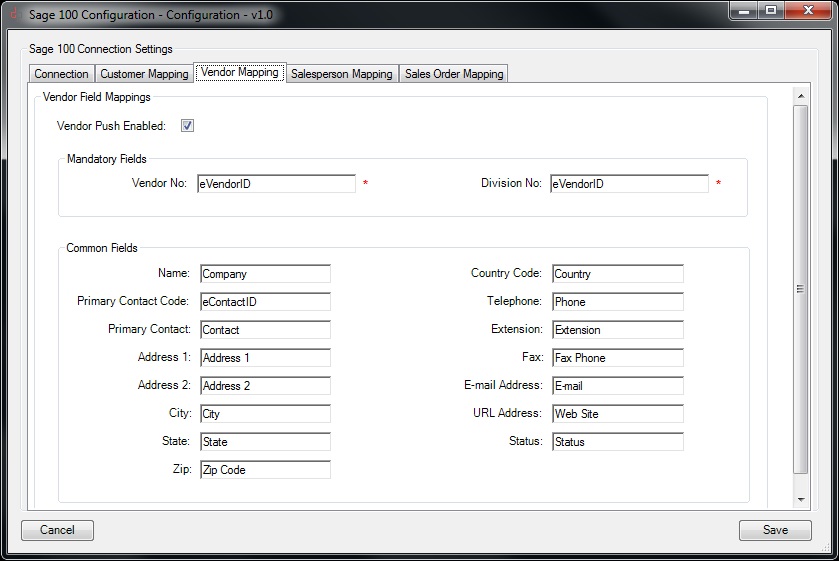
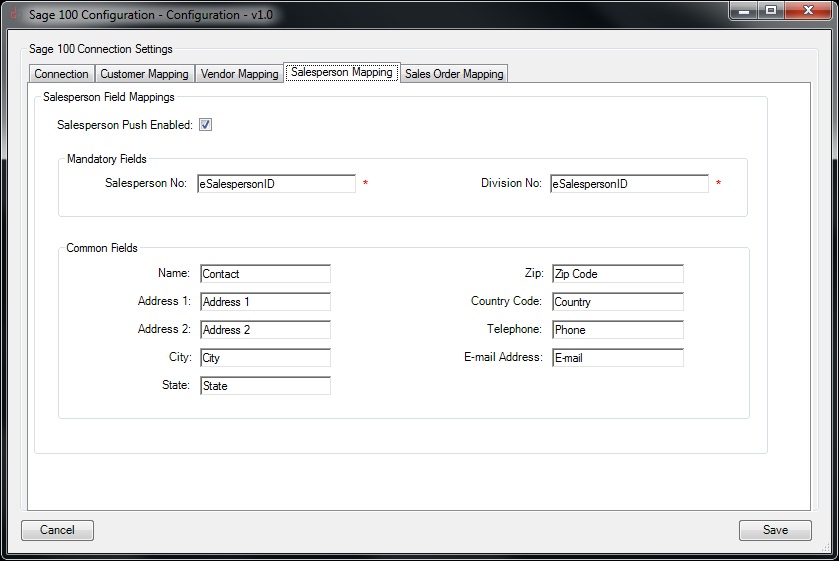
Customer No | Vendor No | Salesperson No

Type Customer Customer Contact Vendor Vendor Contact Salesperson
Number DIV-CODE DIV-CODE-CODE DIV-CODE DIV-CODE-CODE DIV-CODE
Characters Default (2)-(7) (2)-(7)-(10) (2)-(7) (2)-(7)-(10) (2)-(7)
Characters Custom (2)-(20) (2)-(20)-(10) N/A N/A N/A
Note: Characters Custom "Allow Entry of Expanded Customer Numbers" (Accounts Receivable Setup/ Options/Setup//Main)
If this check box is checked, the customer number will increase the length to 20 characters.
You will need to increase the width of Act fields to accommodate the custom field length. Company Level: Customer No, eCustomerID, eLocationID. Contact Level: Customer No, eCustomerID, eLocationID, Contact No, eContactID.
Sample 01-ABC 01-ABC-CFH 01-Bank 01-CBH 01-MBH
After successful push the following Act default fields will be updated
Act Fields Customer No
eCustomerID
Contact No
eContactID
Vendor No
eVendorID
Contact No
eContactID
Saleperson No
eSalespersonID
Contact Push - Auto Nos
    Acquire next Customer No
  1. Use DataPlus to aquire next auto Customer No.
  2. Click on DataPlus tab within Act
  3. Click on Browse All button
  4. Click on Drop Down button for menu display
  5. Choose Customer Auto Increment from menu.
  6. The next number will be displayed in the Next Customer No column

Configure Transaction Push
Create Estimate
  1. Open Act
  2. From Act Toolbar
  3. Tools/Sage100/Configure Sage 100 Push
Sales Order Mapping
    Field Mapping
  1. If you want to allow sales order push, check Sales Order Push Enabled
  2. Check Disable Company Selection
  3. Note: Push to multiple Sage companies are allowed. If you have more than one company to push to, then leave Disable Company Selection UnChecked
    Header Fields
  4. We recommend leaving the existing default fields
  5. Customer Fields
  6. We recommend leaving the existing default fields
  7. Date Fields
  8. We recommend leaving the existing default fields
Sales Order Mapping
    Field Mapping
    Sage Fields
  1. We recommend leaving the existing default fields
Sales Order Mapping
    Field Mapping
    Billing Address Fields
  1. We recommend leaving the existing default fields
  2. Shipping Address Fields
  3. We recommend leaving the existing default fields
  4. Click on Save
  5. Click on OK
Related FAQs
   
Software Solutions
DataPlus Integration
DataPlus ERP Integration
DataPlus Custom Integration
DataPlus Addons
DataPlus Plugins & Tools
Hosting Solutions
Mobile Solutions
QuoteWerks Quoting Solutions
QuoteWerks Integration
QuoteWerks Subscription & Licensing
Act! CRM Solutions
CRM
CRM & Marketing Automation
Marketing Automation
Pricing
Mobile Solutions
Helpful Links
Act! Hosting Solutions
Act! Mobile Messenger
Act! ERP Integration
Act! Custom Integration
Act! Addons
Act! Plugins & Tools
Act! Training
Act! Resources
Act! Support
Act! Community
Act! Downloads & Updates
Learning - Support
Software Support
Support (GoToAssist)
Support Plans
Training
Act! Training
KB Hogan Data / DataPlus
KB Act! Questions
KB QuoteWerks Questions
Contact Us
About Us
How Can We Help You
Privacy Policy
Return Policy
Resources
DataPlus Subscription
DataPlus Maintenance
QuoteWerks Maintenance
Partner Lead Submission
Secure CC Authorization
Secure CC Pre-Authorization

Translate this page:
©1995 - 2019 HOGAN DATA | All rights reserved